
SPC Extruded Rigid Core - Uniclic
Installation, Care and Warranty
PLEASE READ ALL INSTALLATION INSTRUCTIONS CAREFULLY BEFORE YOU BEGIN THE INSTALLATION. IMPROPER INSTALLATION WILL VOID WARRANTY.
Before installation, always check the flooring tiles and planks for defects such as chips, color or sheen differences under well-lit conditions. Also check that the click channel is clean and free of debris. Always work out of multiple boxes to mix products to achieve proper pattern repeat and color appearance. Color variations between flooring, samples, and replacement material are expected and is not a product defect.
If the appearance of a board is questionable for either dimensions or appearance, the installer should not use this piece. A replacement carton can be obtained through your dealer in a reasonable time.
The person installing the floor is responsible for inspecting all the flooring before and during its installation. If the installer believes the flooring is not correct due to color, grade, gloss, or any installation issues, the installer should not install this material. The retailer where the flooring was purchased should be contacted to address the issues. Continuing to install the product means that the homeowner/installer accepted the visually suspect material for installation so the claim will be denied.
NOTE: The Products can be installed above, on and below grade.
Walls, subfloors, and floors installed in buildings and houses move. A minimum of 3/8” gap for expansion is recommended between the installed floor and any adjacent perimeter wall, vertical structure, or wood-based floor (laminate or hardwood).
INSTALLATION JOBSITE PREPARATION BEFORE INSTALLATION
Crawl spaces – For the protection of the home, when installing a moisture barrier in a crawl space, minimum crawl spaces of 18” are required from the ground to the underside of the joists. A vapor barrier of 6 mil thick polyethylene film with 6” to 8” sealed overlap joints should be used. Moisture resistant tape should be used as the vapor barrier sealant at the lap joints. (This same procedure can be used for installing film vapor/moistures over concrete subfloors). Venting for the crawl space should be at least 1.5% of the crawl space square footage. Vents should be located for cross-ventilation of the crawl space. Local regulations should always prevail.
Before floor installation, the room conditions in the installation area (temperature and moisture) should be in normal year-round conditions for at least one week prior to, during, and continuously after flooring installation. Acclimation is not required before installation unless the product has been stored at high temperatures just prior to installation. Recommended installation room conditions are temperatures between 40 to 100 degrees F for SPC. Never install below or above these temperatures. Normal room temperatures are used at temperatures between 65 degrees and 85 degrees F.
Asphaltic “cut-back” adhesives can stain SPC flooring. These must be 100% removed, encapsulated or covered with plywood underlayment. Some previously manufactured cutback adhesives contained asbestos fibers, which are not readily identifiable. Do not use power removal devices, which can create dust. The use of solvent-based adhesive removers is never recommended. NOTE: If d-limonene (citrus based) cleaners/removers are used (Orange All), subfloor must be thoroughly rinsed. If complete removal of old adhesives or covering them with plywood is not possible, the use of a Portland Based Leveling or Patching Compound is acceptable. Please follow the manufacturer’s instructions carefully.
For “Recommended Work Practices for the Removal of Resilient Floor Coverings” write to the Resilient Floor Covering Institute, 966 Hungerford Dr., Suite12-B, Rockville, MD 20850.
SUBFLOOR PREPARATION
Elite Flooring WPC is a waterproof product. Moisture will not damage the product. When installed, it does not produce a moisture barrier, nor does it protect the walls or structure of the home from moisture. Installing a moisture barrier in a crawl space under a wooden subfloor or between the WPC and a concrete subfloor is recommended.
Over a concrete subfloor, we recommend either a “roll-out” or “roll-on” moisture barrier be installed over a below or on-grade concrete subfloor where there is a concern about water or hydrostatic pressure issues. An example of a ”roll-out” moisture barrier would be a 6-mil poly film with water-resistant taped seams that are 6” to 8” overlap. An example of a “roll-on” moisture barrier would be a sealant applied to the surface of the concrete slab to mitigate moisture and moisture pressure issues in the slab. Please follow the manufacturer’s instructions for roll-on moisture barrier installation.
Please note that Elite Flooring does not accept claims related to damage or failure of the floor caused by excessive moisture, alkali and/or vapor/moisture hydrostatic pressure. The final responsibility for determining if the concrete subfloor is dry enough to accept the flooring installation lies with the installation company or floor covering installer. Do not install the new flooring over a concrete subfloor with high moisture, alkali or vapor/moisture hydrostatic pressure conditions if it has not been remediated. Please see below the Subfloor Requirements section for moisture limits to protect the home from moisture damage.
SUBFLOOR REQUIREMENTS
All subfloors must be dry, structurally sound to support the floor and to protect the home from moisture, free of debris and foreign matter, and flat to 3/16” in a 10-foot radius or 1/8” in a 6-foot radius. The substrate must be level and not slope more than 1 inch per 6 feet in any direction.
For concrete subfloors, the subfloor should be firm, flat, permanently dry, and clean. This includes both old and new concrete floors. New concrete slabs must be cured in well-ventilated conditions for at least 60 days minimum before installing the floor. Concrete that is on or below grade should have a minimum-6mil poly film vapor/moisture barrier beneath the slab between the concrete and ground. Maximum moisture level per ASTM F1869 Calcium Chloride test method is 8lbs. per 1000 cft in 24 hours. The maximum level of relative humidity per ASTM 2170 test method is 80%. Electronic meter testing is not acceptable as a replacement for the use of these two tests. The pH of the concrete slab should be determined using ASTM F710. The pH test results should measure between 7-10.
These moisture and alkali levels must be met before it is acceptable to install the flooring. It is the responsibility of the flooring installer or contractor to meet these requirements. We recommend that a vapor/moisture barrier be installed over below and on-grade concrete subfloors. Elite Flooring does not accept claims related to damage or failure of the floor caused by excessive moisture, alkali and/or liquid or vapor hydrostatic pressure. Do not install the new flooring over a concrete subfloor with high moisture, alkali or hydrostatic pressure conditions if it has not been mitigated or remediated. If moisture mitigation or remediation techniques are required, the choice of technique to mitigate (concrete slab sealing, installation of poly film under the flooring, etc) is the sole responsibility of the flooring installer or contractor. Follow the moisture barrier product manufacturer’s installation instructions.
The concrete subfloor must be smooth and free of roughness, excessive texture, irregularities in height, and abrupt elevation changes.
The subfloors must be free of any contaminants, harmful substances or foreign materials that could reduce adhesion, adversely impact the installed plank performance or rate of moisture dissipation from the subfloor or cause the installed flooring to discolor.
All pre-existing tiles and other approved floor coverings must be well bonded to the base subfloor. Ceramic, quarry, terrazzo, and similar types of tiles require filling of grout joints and imperfections using floor patching materials in commercial installations. If the product is glued down, the grout joints will need to be filled. It is key that the subfloor flatness tolerance be met to accept all installations.
For plywood, OSB, and particleboard subfloors to be acceptable for flooring installation, they must be dry (maximum 12% moisture content) and properly secured to accept a top floor. All wooden subfloors must be firm and have no movement when walked on before the flooring is installed. Subfloor flexing may cause squeaking in both the subfloor and the installed floor or cause push-down locking systems to become out of alignment and break where the joints engage during installation. Check the installed floor before leaving the job. If squeaking or broken end joints are found, remove that flooring section and fix the issue before completing the installation. Please note that sounds emanating from between the subfloor and moisture barrier are defined as subfloor issues and are not covered by the product warranty. The subfloor must be secured every 6” along joists with nails or screws to avoid deflection or excessive vertical movement of the subfloor. Subfloor deflection may cause squeaking or popping sounds in both the subfloor and the installed floor. Our warranties do not cover any flooring issues caused by inadequate substructures. The subfloor must be level and flat per the specification and tolerance stated. High spots must be ground down and low spots must be filled with a Portland cement leveling compound. Please note that the Products are not approved for installation over any type of carpet.
NOTE: Never install the Products over any type of floating floor. All subfloors that are not concrete must be firmly bonded.
NOTE: Never install the Products over a below grade VCT (vinyl composition tile).
Tiles including ceramic, resilient, and sheet vinyl must be well bonded to the subfloor, must be level and flat, and must be clean. Existing vinyl floors should not be sanded as they may contain asbestos.
INSTALLATION TOOLS
Safety Glasses
Broom/Vacuum
10 ft straight edge
3/8” spacers
Pull bar
Saw
Utility knife
Pencil
Tape measure
Ruler
Chalk string
ACCEPTABLE SUBFLOOR TYPES
CDX Underlayment Grade Plywood (minimum of 5/8” thickness)
Underlayment Grade Particleboard (only for floating installation)
OSB (minimum ¾”, 23/32” thickness)
Concrete slab
Ceramic Tile – one layer well Bonded
Resilient Tile – one layer well bonded, no pad or cushion attached (Not Below Grade)
Sheet Vinyl – one layer well bonded
Polymeric poured (seamless) floors
DO NOT INSTALL OVER
VCT installed on below grade concrete.
Existing resilient tile floors that are below grade
Existing cushion-backed vinyl flooring
Carpet
Rooms with sloping floors or floor drains
Wood underlayment’s, parquet or hardwood flooring that has been installed directly over concrete
Do not install over any floating floor
Do not install over additional padding!
BASIC INSTALLATION FOR SPC
All trades must finish before flooring is installed, and the job area must be cleared and cleaned of debris that can damage the Product before installing the flooring. While the Products are dimensionally stable, buildings, walls, and existing hardwood and laminate floors will expand and contract. Because of this, we recommend for all installations, both floating floor and glue down types, that an expansion gap of at least 3/8” be left for expansion between the Products, any vertical surface, an adjacent perimeter wall or wood-based floor (laminate or hardwood).
As stated earlier, always work out of multiple boxes to mix products to achieve proper pattern repeat and color mix for the look of natural wood. A minimum of 3 boxes of products is recommended. Inspect each plank or tile in good light for visual defects. If they show visual faults or damage, do not install them. It is the responsibility of the installer to ensure that the appearance of the finished floor meets the consumer’s expectations. The Products are for indoor use. They will not be warranted when installed in locations or conditions not recommended for this product.
BASIC INSTALLATION FOR THE PRODUCTS WITH UNICLIC LOCKING SYSTEM
All trades must finish, and the installation area must be cleared and cleaned of debris that can damage the Product before installing the flooring. While the Products are dimensionally stable, buildings, walls, and existing hardwood and laminate floors will expand and contract. Because of this, we recommend for all installations, both floating floor and glue down types, that an expansion gap of at least 3/8” be left for expansion between the Products, any vertical surface, an adjacent perimeter wall or wood-based floor (laminate or hardwood).
As stated earlier, always work out of multiple boxes to mix products to achieve proper pattern repeat and color mix for the look of natural wood. A minimum of 3 boxes of products is recommended. Inspect each plank or tile in good light for visual defects. If they show visual faults or damage, do not install them. It is the responsibility of the installer to ensure that the appearance of the finished floor meets the consumer’s expectations.
The Products are for indoor use. They will not be warranted when installed in locations or conditions not recommended for this product.
PLANK INSTALLATION METHOD


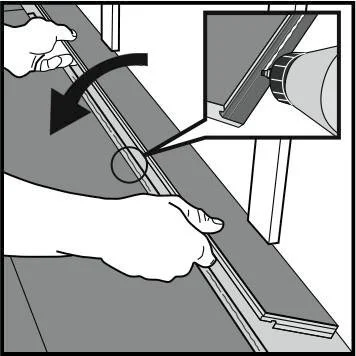
Fig 1. Prior to installation, measure the width of the room to decide if the first row should be but length wise to equalize the widths of the first and last rows. See also fig 12.
Turn the tongue side of the plank to face the wall. Maintain a gap of 5/16” (8mm) on the short side. Spacers can be used to make sure that the gaps are correct around the installed flooring. After 3 rows, adjust the long side so that the planks are 5/16” (8mm) from the wall.
After 3 rows have been clicked together, reposition the flooring against the front wall keeping a gap of 5/16” (8 mm).
Fig 2. Hold the second plank short end tongue against the first plank short end groove at an angle to engage and press the short ends together. Lay the connected planks flat on the floor.
Complete the first row by connecting more planks in the same manner.
Fig 3. At the end of the first row, measure and cut the final plank to the correct length, leaving a 5/16” (8mm) gap between the plank and the wall for expansion.
The recommended minimum length of the final plank is twice the width of the plank
Fig 4. Add the first plank to the second row by positioning the remaining part of the first row’s last plank as first plank of the second row. Keep the plank length a minimum of two times the plank width.
Keep the same 5/16” (8mm) gap at the row ends against the wall.
Fig 5. NOTE: The short ends of the planks in parallel rows must be staggered a minimum of two times the width of the plank. For example, if the plank is 7” wide, the length of the plank stagger needs to be a minimum of 14”.
Fig 6. Place the second row plank tongue at an angle against the first row plank groove. Gently tapping the planks together while lifted may help engage the joint between the two planks. Press forward and fold down at the same time to engage the lock.
Fig 7. Second plank second row. Place the short end of the plank at an angle against the previous installed plank and fold down to engage the short ends. See Fig. 2 above.
Horizontal installation – Last rows, Radiators and under Door Jams
Fig 8. Lift the engaged planks up just over an inch, push them against the row in front to engage the long side. The use of a wedge with the suitable angle can be placed under the plank near the short side joint as support.
The planks can now be folded completely down to horizontal position and if a wedge is used it can be moved to the next short end joint.
Fig 9. After 2-3 rows, adjust the distance to the front wall and side walls to keep the gaps at 5/16” (8mm). Install the remaining flooring. Spacers should be removed once the installation is completed.
Fig 10. If the wall is uneven, the planks must be cut to match its contours. Mark the planks with the contour of the wall. Do not forget to leave a gap of 5/16” (8mm) to the wall. This procedure must also be used for the first row if necessary.
Fig 11. When it is difficult to angle the plank under a door jam, around a radiator, or installing last rows, the left and below pictures show how to cut away the locking edge and still install the plank.
Fig 12. Cut off the locking element with a chisel, apply applicable glue on the adjusted strip and push the planks horizontally together. If necessary, place some spacers between the last board and the wall during glue drying. The method can also be applied to the short ends. Appropriate glues are cross-linked PVA glues, class D3.
RADIATOR PIPES - CUT OUTS.
INSTALLATION AROUND RADIATOR PIPES:
Mark the center of the holes and drill the hole with a diameter about 5/8” (16 mm) larger than the pipe diameter (5/16” gap (8 mm)), cut as shown with a saw or with a sharp utility knife. Install the floor plank. If necessary, glue the cut piece into place.
Where the use of a caulk is needed, we recommend a 100% silicone caulk and do not approve the use of acrylic caulks. High quality silicone caulks remain flexible and will allow the installed floor to continue to float and move with temperature changes whereas acrylic caulks will harden over time and stop this from occurring.
The products include an attached underlayment pad. The click side and end joints are designed to work with this specific pad. Elite Flooring does not warranty the product with an additional pad installed under it.
REPAIRS
SPC flooring is durable; however, planks can be damaged. If the damaged plank is near the perimeter of the room, the best technique is to carefully unlock the planks until the damaged plank is removed. Replace the damaged plank and reassemble the flooring. If the damaged plank is in the center of the room, then the following procedure should be followed:
Use 3M Blue Tape around the perimeter of the damaged plank to be replaced to protect the surrounding planks from damage.
Using a utility knife, make a cut completely through the center of the damaged plank the length of the plank.
Carefully remove the cut pieces of the damaged flooring and clean and vacuum the exposed area.
Use a utility knife to remove the tongue from the long and short side of the replacement plank.
Remove 1.5 inches of the groove on the long side of the plank from the tongue end using a utility knife.
Apply a small bead of an Ethyl Cyanoacrylate adhesive super glue to the groove of the planks in the floor.
Insert the replacement plank into the exposed area, locking the long-grooved side into the existing floor. The tongue end of the replacement plank will overlap the existing floor until the plank is completely inserted.
Use a scrap piece of the flooring as a tapping block to lightly tap the groove end into place. Use a utility blade to adjust the opposite end as you tap the end joint together.
Weight the plank down until the super glue is completely set.
FINISHING MOLDING

Reducer molding is used to finish flooring when the adjoining surface is lower than the SPC flooring or when flooring meets carpet. Position the U track 7mm leaving expansion gap of at least ¼” from each edge of the. Screw, nail or glue down the track directly to the subfloor and then insert the reducing strip into the track.
T-molding is used to finish flooring and add expansion when two level surfaces meet in doorways. Install the same as above. Residential Installations do not require the use of T Moldings.
Commercial installations are recommended to install T-moldings in every doorway and if the maximum room run size is equal to or greater than 100 ft x 100 ft. Minimum of ½” of perimeter expansion space is recommended for large commercial rooms.
Landing molding is used to finish flooring on landings or stair edges. Moldings need to be glued and screwed down to the sub-floor for safety and stability. Color filling should be used to cover the counter sunk screws.
To finish the perimeter of the room, install quarter round molding using finishing nails. Quarter round molding is nailed directly into the baseboard.
RADIANT HEATED FLOORS
Floating floors can be installed over certain types of radiant heated floors. If glue down is an option, then follow the manufacturer’s installation instructions when full spreading our flooring with an approved glue.
WHEN INSTALLING OVER A RADIANT HEATED FLOOR:
A newly installed radiant heated floor must be operational for at least four (4) weeks prior to the installation with the temperature set between 55 to 85 degrees F to ensure that the subfloor has been dried.
Existing radiant heated floors should be set to a minimum temperature of 65ºF (18.3ºC) degrees F for a minimum of 4 days before, during and 48 hours after the completion of the installation. This will ensure that the flooring will acclimate properly before the installation begins. Upon completion of the installation, gradually increase temperature in increments of 5° F per hour until desired temperature is achieved. Never exceed 85 degrees.
Wood subfloors should never exceed 10% moisture content as measured by a calibrated wood moisture meter.
Concrete subfloors must be “dry” using the mat test, a calibrated concrete moisture meter, Calcium Chloride Test or a RH Probe.
Ground floors using the radiant heating system should have a proper moisture barrier beneath it.
The recommended range of relative humidity is 35%-55% and the room temperature should be between 55-85 degrees F for the delivery of the flooring, acclimation, and installation.
The flooring must acclimate to the stated temperature range for at least 48 hours prior to installation in the room to be installed.
Keeping the temperature of the room constant will keep a stable environment for the flooring as well as the home.
The floor surface temperature must always stay below 85 degrees F.
At no time should the relative humidity in the room with the installed flooring fall below 30% during the life of the product.
Electric Radiant Floors consist of electric cables (or) mats of electrically conductive materials mounted on the subfloor below the floor covering. We recommend that the heating elements be separated from the flooring by a distance of at least ½ inch. Maximum operating subfloor temperature should never exceed 85°F. Subfloor levelers used to install electrical radiant floors should have a minimum of 3000 psi compressive strength. Follow the electric radiant floor manufacturer’s installation instructions.
SUN ROOMS
Sunrooms or areas that may be isolated from the main living area of the home are recommended areas of use for SPC if they are limited to 500 sf maximum.
If there is no heat in the wintertime and you wish to use the area, you must bring the room to normal room temperature (65-75 degrees F) before walking on the floor.
Exposure of the floor to prolonged periods of sunlight is not recommended. Drapes and/or blinds are recommended for use during peak sunlight periods. Prolonged direct sunlight exposure can result in discoloration, and excessive temperatures may cause tile/plank expansion or delamination.
During installation, please leave the ¼” expansion at all walls and any vertical surface in this room.
CABINETS
Cabinets may be installed on top of SPC if they are wall mounted.
Center Islands may be installed on top of SPC if they are free standing.
If cabinets or center Islands are being fastened to the floor a 3/4” expansion hole must be used where the bolts enter through the SPC into the subfloor.
POOL TABLES
Pool tables in a residential environment may be installed on SPC either full spread glue down or floating. In a residence, there is a limit of one pool table per room.
CARE AND MAINTENANCE
Once the floor has been installed, vacuum or use a dust mop to clear the floor of any loose dirt or residual dust or debris. The floor can be wiped with neutral pH cleaners or water.
Furniture should have felt pads attached to the feet to avoid scratching the floor.
Heavy appliances or furniture should sit on non-staining large surface flooring protectors.
When furniture has castors or wheels on the feet, they must be suitable for resilient floors, large surface non-staining, and swivel easily. Do not use ball-type castors because they can damage the floor. Castor wheels should be equipped with wide, rubber castors.
Protective mats should be non-staining as rubber mats may discolor the floor.
All furniture pieces should have floor protectors under them.
Walk-off mats should be used in entrances to help prevent dirt from being carried onto the floor.
Exposure of the floor to prolonged periods of sunlight is not recommended. Drapes and/or blinds are recommended for use during peak sunlight periods for all floors and in sunrooms. Prolonged direct sunlight exposure can result in discoloration, and excessive temperatures may cause tile/plank expansion or delamination.
Regularly sweep or vacuum the floor to remove dirt and dust. Do not use a vacuum with a beater bar to vacuum the floor as this can cause floor scratches.
Do not use hard bottomed electric brooms without padding as they can scratch the floor. If pet urine contacts the floor, it should be cleaned as quickly as possible. If the floor is not cleaned and the urine removed, it may dull the finish.
Liquid spills and any wet areas should also be cleaned in a timely manner. The floor can be damp mopped with clean warm water and a dilute floor cleaner as needed. Do not use harsh cleaners or chemicals, abrasive scrubbing pads, abrasive tools, or abrasive cleaners as they can scratch the floor. Do not use detergents and do not use floor wax or shining products like “mop and shine” types on the floor.
Petroleum-based products can stain the surface of your vinyl floor. These include materials like asphalt driveway sealer and engine motor oil, among others.
STEAM CLEANERS
Elite Flooring does not recommend the use of any type of steam cleaner on our floors. These types of cleaners generate too much moisture and heat during their use. The resulting moisture and heat can be enough to break down any adhesives used in the manufacturing of this product. Also, in instances where no glue is used, both peaked and swelled plank or tile edges can occur. Therefore, all complaints that are determined to be from a consumer using a steamer will be denied by Elite Flooring.
WARRANTY INFORMATION
SPC EXCLUSIVE LIMITED WARRANTY
Elite Flooring warrants that its Product planks and tiles are free from any visual or manufacturing defects. If the products are found to be defective, Elite Flooring will supply new product of the same or similar style, size, color, grade, and gauge to repair or replace the defective area and will pay reasonable labor costs provided the flooring is professionally installed and maintained according to the installation instructions provided. All products purchased for an installation should be inspected by you and/or your installer. Pieces that are visually defective should not be installed. Elite Flooring will not be responsible for reimbursing labor charges on any claim for visually defective product installed. It is the responsibility of the installer to determine the suitability of the product for installation before it is installed.
If a problem occurs during the installation of the planks and tiles, the job should be stopped immediately. The proper action is to immediately report the problem to your dealer and distributor who, in turn, will contact Elite Flooring. Any costs caused by continued installation after the problem is identified will not be covered by Elite Flooring.
Products that are non-defective but are damaged during improper installation by not following the Elite Flooring installation guidelines do not constitute a valid claim as defined by this limited warranty. This warranty will not include loss of time, inconvenience, incidental expenses (such as telephone calls, removal and replacement of items placed over the floor after the original installation, etc.) included in the removal and reinstallation of the affected material, and any other incidental or consequential damages. Elite Flooring reserves the right to inspect any claim and/or request photographs and/or samples associated with the specific claim prior to approving any claim. All limited warranties are valid for the original purchaser of the flooring only and are not transferable.
WEAR LIMITED WARRANTY
Elite Flooring SPC planks and tiles are protected with a wear layer. Elite Flooring warrants that there will be no wear-through of the wear layer for the number of years indicated for the specific product. “Wear-through” means complete loss of the wear layer so that the printed color layer is changed or affected. The terms for your specific product wear Limited Warranty will appear on the insert of the product you purchased. This Limited Warranty applies only to first quality merchandise provided the recommended installation and maintenance procedures are followed as outlined in the Installation Instructions and Owner’s manual.
PET WARRANTY
Elite Flooring SPC planks and tiles are warranted to resist stains caused by pet soiling from domestic dogs and cats during the specific warranty time frame. The pet stains include urine, feces, and vomit. Resisting stains means that your floor can minimize or hold out permanent stains under the conditions stated. Pet accidents should be cleaned up immediately, as the longer they sit, the more difficult they will be to remove. Any damage to the subfloor and/or surrounding structure caused by pet soiling is not covered by this warranty. Please follow our maintenance procedures for cleaning the affected areas. This warranty does not cover soiling and staining caused by any other pet type besides those stated above.
INTERNET WARRANTY
Various retailers on the internet sell our waterproof flooring products. While some websites are operated by retailers that maintain physical stores and provide excellent service, other websites are operated as internet-only retailers that do not provide service. If you choose to purchase your products from an internet-only retail provider, please be advised that such products will be covered by a 1-year warranty for manufacturing defects.
Warranty claims for anything other than an initial defect of the product are explicitly excluded. None of our installers, retailers, distributors, or employees has the authority to alter the obligations, limitations, disclaimers, or exclusions under any of our warranties. There are no other warranties beyond this expressed limited 1-year warranty.
WATERPROOF LIMITED WARRANTY
Elite Flooring SPC planks and tiles are warranted to be 100% waterproof. The structural integrity of the planks or tiles, when properly installed and under normal use conditions, will be resistant to damage caused by exposure to water for the life of the product. “Normal use” conditions mean normal cleaning, everyday spills, and moisture overflow from normal use conditions.
Mold and/or mildew can sometimes occur in a building if moisture issues are not addressed. This moisture warranty excludes damage resulting from the growth of both mold and/or mildew due to extended moisture exposure.
While SPC planks and tiles are waterproof, the floor is not a waterproof barrier for moisture from the subfloor and surrounding structure. The moisture warranty does not cover damage caused by hydrostatic pressure, alkali, and excessive moisture intrusion from the subfloor, flooding, household leaks (such as pipes), or mechanical failures like appliance and heating equipment leaks. (See Subfloor Requirements).
If the SPC planks and tiles are structurally damaged and the cause is determined to be by exposure to water from normal use conditions, Elite Flooring will arrange a credit subject to the terms as described below in the “Terms of Lifetime Limited Warranty” section. The term for your specific residential product Limited Warranty will appear in the carton insert of the product you purchased. For commercial installations, Product planks and tiles damaged caused by exposure to normal use water will be subject to a pro-rated credit as described below in the “Terms of Lifetime Limited Warranty” section.
WATERPROOF LIMITED WARRANTY DOES NOT COVER:
Any damage to structures that are not part of the installed SPC flooring such as damage to surrounding walls, subfloor, structures, fixtures, furniture, underlayment, moldings, trims, and subfloor heating systems, or anything that is not the tile or plank.
Any damage from mold and/or mildew growth due to extended water exposure.
Flooring that is installed outdoors.
TERMS OF LIMITED COMMERCIAL WARRANTY
Claims reported on material defects of this SPC flooring will be prorated over the life of the product. Reasonable labor costs will be paid with the following exceptions:
Claims reported after 1 year of use will pay labor charges at the rate of 50% reasonable labor charges.
Claims reported after 5 years of use will not pay labor charges.
This warranty shall not include loss of time, inconvenience, incidental expenses (such as telephone calls and removal and replacement of items placed over the floor after the original installation) included in the removal or reinstallation of the affected flooring materials, and any other incidental or consequential damages. This warranty is in lieu of any other warranties expressed or implied.
This warranty service is available only by notice to your distributor through the dealer from whom the purchase was made. Notification must be accompanied by a copy of the original invoice and can only be authorized by your distributor.
LIMITED WARRANTY EXCLUSIVE AND CONDITIONS
Commercial use means daily activities commonly associated with a commercial environment. Hill Rom Beds are not recommended.
Warranty coverage for any replacement flooring planks will be limited to the remaining time of the original warranty.
Warranty coverage does not apply to seconds, off-quality, or “as-is” goods.
Warranty coverage applies only to the original purchaser of the flooring and the original installation site is non-transferrable and prorated by time of use.
Warranty coverage does not apply to conditions or defects caused by improper installation, the use of improper materials during installation, or inadequate sub-flooring preparation as described in the Owner’s Manual.
Warranty does not apply to damage or failure of the floor due to excessive moisture, alkali and/or vapor/moisture hydrostatic pressure.
Warranty coverage does not apply to construction-related damage.
Warranty coverage does not apply to color variations between samples or printed illustrations and the actual production runs.
Warranty coverage does not apply to reduction of gloss from use or improper maintenance.
Warranty does not cover changes in color or sheen from exposure to sunlight or due to rubber-backed mats.
Warranty coverage does not apply to products sold through unauthorized dealers.
Warranty coverage does not apply to conditions caused by using steam cleaners.
Warranty does not apply to damage that results from not following floor maintenance instructions.
Warranty does not apply to damages resulting in scuffs, scratches, cuts, staining from rubber-backed mats, or damage or discoloration from carpet dyes, fertilizer, asphalt from driveways or chemicals.
Warranty does not apply to damage caused by burns, flooding, fires and other accidents.
Warranty does not apply to damage caused by abuse (such as dragging heavy or sharp objects across the floor without proper protection for the floor or with heavy wheeled vehicle traffic that can permanently indent or damage the flooring).
Warranty does not apply to damage caused by wheelchairs.
Warranty does not apply to damage caused by caster wheels or vacuum cleaner beater bars.
Warranty does not apply to failure to support furniture with floor protectors made of non-staining felt.
or non-pigmented hard plastic.
Warranty does not apply to discoloration from heat or sunlight.
“Wear-Through” means complete loss of the wear layer so that the printed pattern or design of the floor is altered.
“Residential use” means daily activities commonly associated with residential use.
If you have any questions regarding the above information, please contact your local flooring dealer or distributor.
REV: 25 March 2025